Saturday, September 11, 2010

Easiest project ever

Share
Have you ever wondered what to get someone as a housewarming gift? (Kevin's favorite housewarming gift was a garden hose from our friend Marty.) Do you consider yourself non-crafty or just not the artsy type? Well then, this project is for you! It is actually for the crafty, creative types too. 


This project also helps to solve the how-do-I-decorate-my-bathroom-without-putting-decorations-in-it problem. My great grandmother knit kleenex box covers. I make fancy bubble bath holders! To each their own.


I consider this project 'super-easy' on an easy-medium-hard scale.


Process
  1. Have a romantic dinner with your significant other or a great night out with friends over a bottle of wine or champagne. Bring a large purse, or satchel, as my friend House would say.
  2. Keep said bottle of wine or champagne and cork.
  3. Clean bottle with soap and water (preferably the next morning so you do not get in one of those glass bottle + hard floor type of situations which will only make matters worse).
  4. Buy your favorite bath salt or bubble bath. Colorful bubble bath is extra lovely. To be honest, I get the non-fancy type suds or salts from Target for this purpose. 
  5. Fill bottle of wine with suds or salt. Bonus points if you had shared the bottle with the person you are giving the gift to.
  6. Add a little tag with a ribbon that includes to/from info. or a personalized note.
  7. Give gift and do not forget to mention, you made it yourself!
The bottles I have sitting next to my tub are from my wedding and a nice dinner Kevin and I had back in 2003. 


If the bottle brings back great memories, this project is also a nice alternative to displaying an empty bottle in your home on a shelf college style. 


There are so many reasons to go for it, so what are you waiting for? By the way, do you want to come over for dinner? I accept gifts.


Wednesday, September 8, 2010

Grand entrance

Share
The thing about updating your patio with glorious rich new mahogany planks is that it makes everything else look horrible. Ah, the house really should be painted. Oh, those trim boards look like they went down with the titanic, were found years later and then repurposed as trim on the house. 


Ok, so the paint on the house is not all that bad. However, the trim boards around the side door, a.k.a. the door we use all of the time, were in desperate need of some help. 


Before shots. If you look really close, you can see a furry little helper, which freaked me out by the way. I did not notice this when I first saw this image.


This was more or less Kevin's project, so here is a rundown of the materials and process as told by him. According to Kevin, this is a medium level of difficulty project on a low-medium-high scale. Enjoy!


Materials


  • 1x6 pine lumber
  • brad (finishing) nails
  • primer paint
  • trim paint
  • table saw
  • miter saw
The process
  1. First thing I did was to put down a moving blanket over my new deck to keep myself from injuring it by accidentally dropping tools or dripping paint.
  2. Remove the bad trim with a hammer and a large and small flat pry bar.  This will help you to keep from damaging the surrounding wood.
  3. Inspect the area that was under the trim.  Look for mold or other weak spots that need repair.  I had to chisel out a chunk of the original door frame and cut a piece of treated 2x4 to fill it in.  I then had to do 3 or 4 layers of wood filler to make it as seamless as possible.
  4. On old homes, the old trim might not be a consistent width.  I had to cut the siding back a little bit to make a straight line.
  5. Measure twice, cut once.  I had to cut a notch in the trim because part of it extends down below the threshold.  I used a table saw and a hand saw to make it just right.
  6. Prime the trim boards before you nail them on.  This makes it much easier.  You can even do the finish paint before nailing them on, then touch up later.
  7. I nailed the trim to the door frame using finishing nails.  The old trim was nailed on using standard 8 penny framing nails, so the nail heads were very visible.  Finish nails allow you to sink them with a nail punch and then fill the hole with wood filler so that it disappears when painted.
  8. Finish painting the trim with some leftover paint from the last painting, or get it color-matched at the local hardware store.
  9. Drink a beer and pat yourself on the back.
Inspection.


Now for the after shot. Much bettah!


Monday, September 6, 2010

Cleanin' out my closet

Share
This is one of those projects that you get halfway through and you wish you never started! After having a lot of fun in Boston all day Saturday, I determined that I needed to tackle a project over Labor Day weekend so I decided to clean out the closet on the third floor. Easy enough, right?


This was a straightforward choice for two reasons. First, the Epilepsy Foundation is doing a donation pick-up on Tuesday and I am sure there are coats and gloves and all sorts of good stuff that others could use more than we could. Second, we have reached the critical point where a place for everything and everything in its place no longer applies because we have run out of 'places'. This just was not cutting it because I pride myself in organization and anti-clutter. What kind of self-proclaimed organization queen would I be if my art studio & Kevin's workout room, aka the third floor, was beginning to look like a place to stash stuff.


Since I was taking everything out of the third floor closet, I might as well paint it! And since painting is boring, I may as well take this opportunity to design something cool on the painted floor. Now, two days later, I am exhausted, the third floor looks way worse than when I started (see images below) and I look like I was just out on a paintball battlefield and the other team won. You have to realize, I am writing this mid-project and my smile-o-meter is only now just starting the upswing after reaching the low point a few hours ago. 


The fun part about doing a thorough closet cleaning is the random stuff you find. Amongst my favorites this time around were:


  • My first license and passport. My passport looked like a mug shot. They very clearly told me I was not supposed to smile. Luckily, the rules have changed. 
  • $3.39. I am actually making money on this project so far!
  • My calculus book from college. This made me feel really smart for a second...did I really learn all of that?!
  • Ornaments that I had misplaced
  • Kevin's red tie. Oooooh, my favorite!
  • My cheesehead. Just in time for the season!
  • Satin wedding shoes. Yes, of course I tried them on in my painting clothes!
  • My wedding bouquet. Gardenias and mini-calla lilies. 'How many lilies should I have?', I inquired. My florist replied, 'Enough to be proportional with a tall girl. I will decide.' You did good Gene!
  • A broken window behind the piece of insulation that was tacked over the window. Well, at least I have $3.39 for a broken window fund.
  • My materials science and engineering course books with my professor's monkey sketches. Totally random, I know. Also, totally hilarious!
  • A piece of wood with names carved in it. 
The previous owner's must have salvaged the piece of wood when they finished the third floor. To me, this is one of the perks of owning a 110 year old house. Imagine the history! This may have been from the guys that built the house or kids that lived here once. I am not sure I like the idea of a guy named Wimpy building my house though! Hopefully, this is one of those ironic nicknames, like 'Tiny' for a 400 pound beefcake type.


Wedding shoes and bouquet


Lost ornaments!


Calculus and materials science and engineering. I totally remember this stuff and use it everyday.


Stay tuned for the before and afters. The floor design that is in the works will not disappoint!

Wednesday, September 1, 2010

A snappy app

Share
As you may have realized by now, I love to find inspiration in unexpected places! The problem is that if I want to use my 'inspiration' as a paint color for furniture, wall, other accessories, etc. it is not always easy to have the color matched. This is particularly true if the item is big & bulky like a vintage turquoise truck!

Since Apple has made the claim that there is an app for that, meaning an app for almost anything, I set about trying to find a solution. In my search, I ran across the Sherwin Williams ColorSnap app for iPhone and iTouch. Best of all it is free! You can take an image of anything, choose the portion of the photo to match with your fingertip and it will give you the closest color in the Sherwin Williams paint palette. I also found that the 'myPantone' app does the same thing with Pantone colors and costs $9.99.

For fun, I tested this out on some veggies we picked up at a farmstand. Haven't you always wondered if the color of eggplant is eggplant?


Nope, apparently it is Sommelier.


Try it out, I swear it is a little fun too! I now know the color of my leg, the shirt I am wearing and a Cape Cod chips bag. Obviously, I did not have to go too far to test it out!

Tuesday, August 31, 2010

Oval office makeover

Share
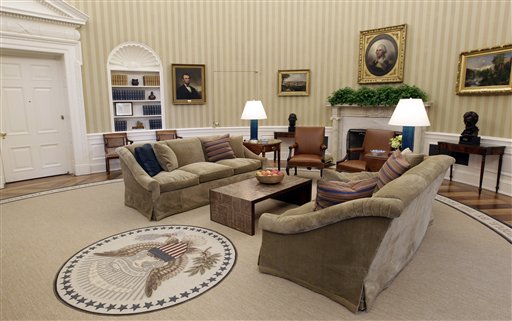
Apparently, each United States president does a little extreme makeover of their office. Today, President Obama's oval office makeover was revealed.


Although I do enjoy a little traditional style (I do live in a colonial style house built in 1900 after all), this office is a little too traditional for me. 

An interesting design concept worth mentioning is surrounding yourself with what inspires you. The quotes bordering the presidential seal are prominent American statements. For example, 'The only thing we have to fear is fear itself.' - FDR inaugural speech. 


Whether it is a written statement, a family heirloom or an image that brings back fond memories, it is great to be in an environment that makes you happy. Of course, second only to the people that make you happy.

I recently found a print that makes me smile each time I walk up the stairs. It also happens to get the Beatles song 'All you need is love' in my head quite often, but hey, that is something I can deal with. Happy Tuesday!


*Oval office images from the Associated Press.

Monday, August 30, 2010

I can build you that

Share
One night I was reading a book and Kevin was reading 'The Family Handyman' magazine. He turned to me, pointed at the page and said, 'I can build you that.' It almost did not matter what it was or where it would go, I was going to love it! And so Kevin's first woodworking project was born; a floating box shelving unit for our entryway. It was sort of our solution for what to do when you do not have a mud room, but you have mud.


Prior to the floating box, we had a metal shoe rack from a big box store; I cannot remember which one. It was pretty flimsy and 2 pairs of Kevin's Shaq-like shoes was about all it could take. We needed a place for more shoes and boots in the winter as well as a place to stash scarves, gloves and small shoes. Therefore, the entryway was just the place for the floating box.


Materials required


  • 1/2" birch plywood
  • Table saw
  • Wood glue
  • Nails
  • Ryobi hand-held router
  • Toe molding
  • Wood filler putty
  • Sandpaper
  • Primer
  • Semi-gloss paint in your color du jour
  • 3" screws
  • Shed (hey, I'm just making a list according to Kevin's instructions)


A how-to guide according to Kevin -


Here is my color coded design.  I got it from 'The Family Handyman' magazine.  I color coded it so that it would be easier to keep straight.


I basically cut out all the pieces as shown in the drawing first. Then I assembled it in my shed. I used 1/2" birch plywood.  Not the best wood you can use, but pretty good.  Especially for a first timer.  It's not too expensive, so if I messed up, it wouldn't cost as much to fix.

It's a little bit like a box inside a box.  You build a simple 1/2 plywood box, glue and nail another layer on top of the first. I got an inexpensive Ryobi hand held router so I could flush-trim the edges that didn't line up perfectly.

In the end, I added a decorative front edge using some toe-molding I had left over from another project.  I simply glued and nailed the toe-molding to the front rim, then the router to trim it flush, because it was slightly wider than the rim.

I used wood filler putty to fill in any cracks or gaps between the wood.  I sanded it all down and rolled on some paint that Marie had gotten.

I then screwed the whole thing to the wall using 3" screws into 2 studs.  Marie put some baskets inside to hold shoes or whatever.

It looks great and is extremely handy.


Marie here again -


Some after shots. The baskets are from Pottery Barn. Less expensive alternatives can be found at Target.


For those of you that are interested, Kevin drew out his design in Microsoft Visio. Being the techy geeks that we are, we like to have everything planned out and visualized in advance to make sure it all fits together right! Of course, this is not a necessary step, but fun for us. If you think this is detailed, you should see the wrap-around deck schematics that Kevin has in the works!


Anyhow, I digress. After the floating box was constructed and primed, I decided to paint the coat rack above the box and the box itself a matching color. The hallway is a very neutral color, Latte from Restoration Hardware, so I decided to spice it up a bit with a peach shade by Benjamin Moore.


Now we have a place for shoes, coats and winter gear. The other added benefit of the floating box is that we placed it so that we could put our boots and larger shoes beneath the box. All in all, it was a very successful first woodworking project. Now the question is, what's next?


Saturday, August 28, 2010

What would Candice do?

Share
Every time I have a tough time making a design decision, Kevin says to me, 'What would Candice do?'. Candice Olson that is. Candice is my design mentor. Ok, I have never met her, but I just know she would take me under her wing if only she knew me. After all, we are both six feet tall and used to be competitive volleyball players. She has a team of people that make her designs reality, I have Kevin. She makes divine designs and I wish I could. 

I bring this up because I recently decided that although I am happy with our living room configuration, there was nothing that was jumping out as being the focal point of the room. The small convex mirror from Restoration Hardware is great, the lamp from Pottery Barn, the wedding photos and so on. However, none of these stuck out as the centerpiece of the room. And then it happened; I met Pierre

There were several suitors first, including the Mansard mirror from Restoration Hardware and the Devon mirror from Z Gallerie. I ended up going with Pierre because I was drawn in by the geometric design and the scale was just right at 34" in diameter. 


Ok, so the mirror decision was not that difficult. Once I had the mirror, I needed a lamp. This is where I ran into trouble. Nothing seemed to work, so I gathered up lamps in the house and bought a few options, then asked myself what Candice would do. 

First up, a lamp from Pottery Barn that was already in the living room on a different end table. Bonus, it wouldn't cost anything. Non-bonus, I would have to replace it. Also, the traditional look of the lamp did not look right next to the geometric mirror.


Next up, a gourd-geous lamp from West Elm with Luster base and Natural shade for $179. I really love it. Definitely a possibility.


Third was an existing lamp that was on my desk. It is a crystal block lamp from Target that was $50 for the lamp and shade. The scale was all wrong, all wrong.


Lastly, another lamp I found at Target that was worth trying. The base was $39.99 and the shade $19.99. I liked this one about the same as the gourd lamp. Therefore, the decision came down to price. Since this one was 1/3 the price of the gourd lamp, it will be living in my house for the long run!


Here is a wider shot. The mirror is now the focal point of the room and the whole set-up works!


Kevin is pounding away outside so we will have another project to blog soon! Happy Saturday!

Tuesday, August 24, 2010

Hidden gem - Amy Butler Design

Share
There are a few design elements that always seem just out of reach. Things I have trouble finding in mainstream shops include convex mirrors (ok, I admit, this is pretty specific!), quality fabrics and cool affordable rugs. Other items such as lamps, desks and end tables seem to be a dime a dozen.


Many of these design needs can be found in smaller shops of talented designers. I was recently talking with my friend Leslie about art and design. I swear we could go on for hours on the topic. Leslie is very talented at surface design and sewing! During our discussion, Leslie brought Amy Butler Design to my attention. Amy Butler's fabrics, organic bedding, rugs, wall art and wallpapers are all worth checking out. Her designs are amazing and can be found at her online shop or used as inspiration for your own designs or projects.


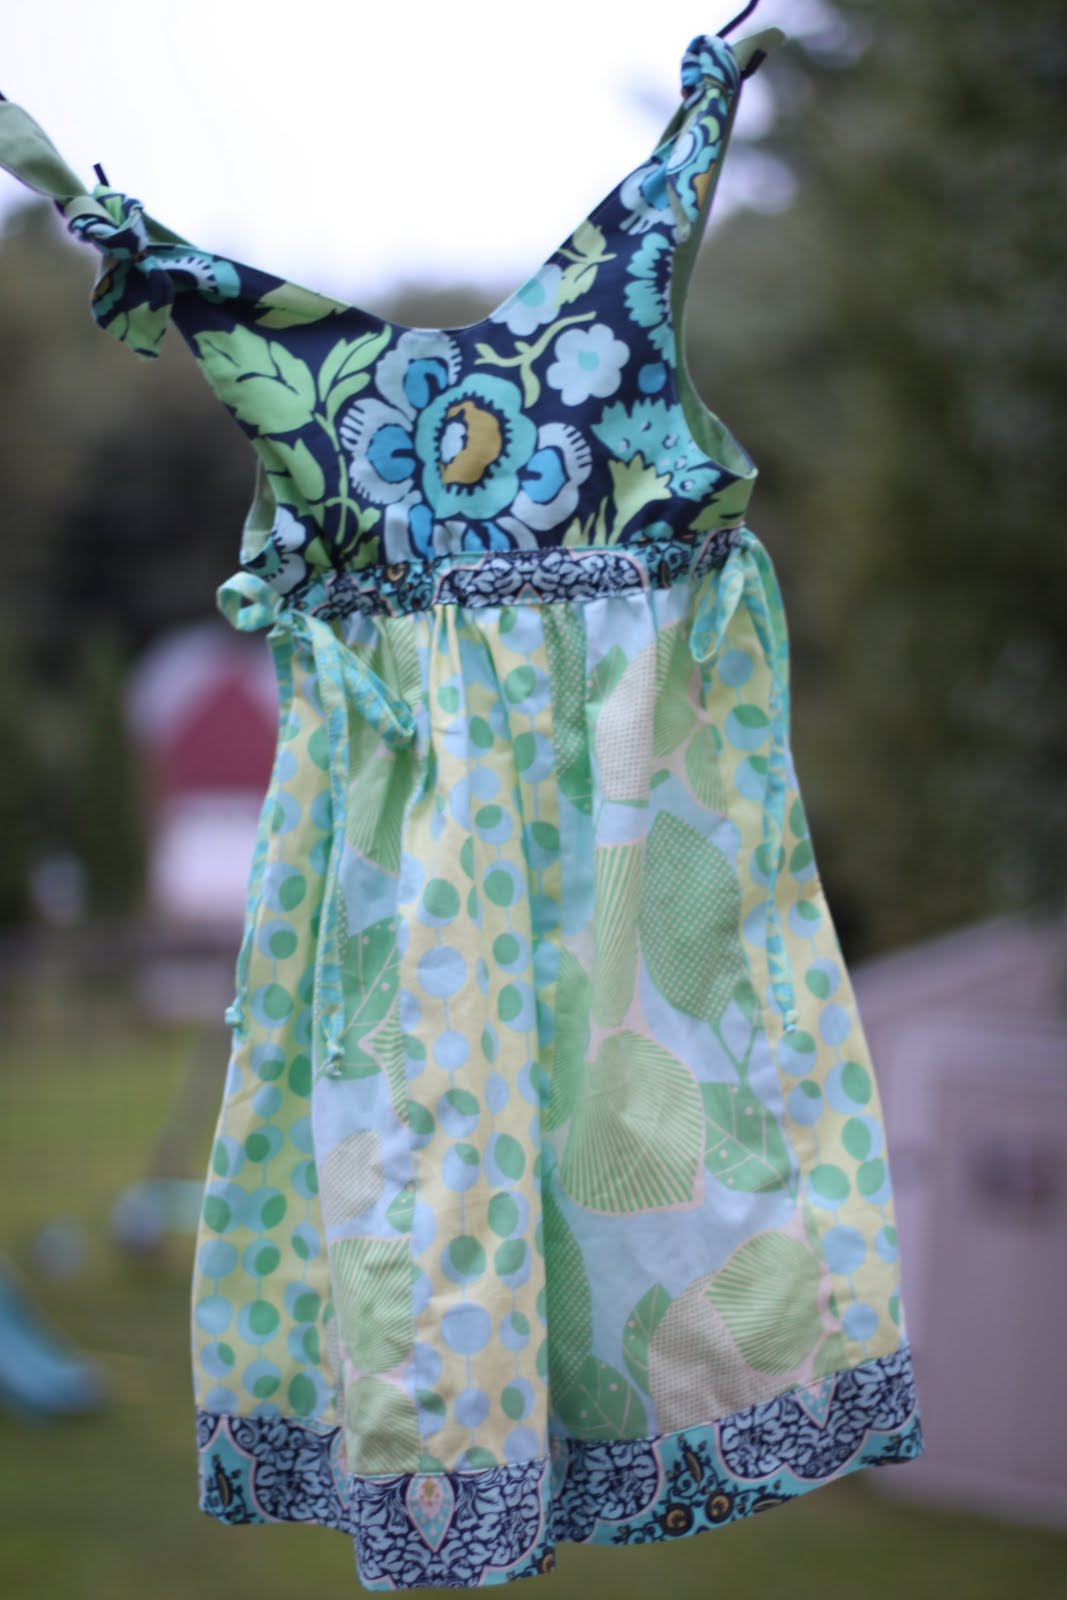
Leslie has made a little girl's dress out of fabric by Amy Butler. The dress has all sorts of little interesting details and is adjustable for a growing child. 


One of the great things about the dress is that the combination of fabric patterns really compliment each other and create interest. This same principle can be applied to interior design. Consider making your duvet cover out of one fabric and curtains out of another or pillows out of one fabric and contrasting wall art with another design.


Woah wait, did you say wallpaper? Don't we all hate wallpaper and immediately begin the arduous task of removing it when moving into a new house kind of like the ceiling fan situation? I think the backlash of dusty rose florals and crafty designs have jaded us from considering wallpaper for a looooong time. I personally had rainbow wallpaper in my room in the early 80's. I loved it! I am not so sure the people that bought the house after us really loved it. 


The thing is, there are some pretty amazing wallpaper designs out there. However, there are things to consider before pasting art to your walls in a semi-permanent fashion.


  • How much do you love it? The answer should be a 9-10 on a scale of 10. Wallpaper is not for the faint at heart and cannot be easily painted over or removed.
  • How about wallpaper on just one wall? The thought of removing wallpaper in a few years on one wall is much easier to stomach than an entire room.
  • Does the room already have a focal point? If yes, wallpaper may possibly be overkill. If no, wallpaper on a focal wall may be just what your room needs to be fabulous.


Here are some examples of some of Amy Butler wallpaper designs.


*Amy Butler images can be found here.